
Thank you all for your kind comments about the bed. Yes it was fun to do - most of the time - and yes it's not that difficult ( otherwise I couldn't have done it). So I don't really like the word 'tutorial' because it makes me sound like I know it all, here is just my version of how I proceeded.

When I bought the bed it was in good condition, upholstered in a slightly dated damask weave and painted shiny cream and gold. I wanted something a little shabbier.

First step was to work out the paint effect I was looking for. I worked on the horizontal side bars first, easier to manipulate and not so visible if I did something stupid. Using a thermal paint stripper and sandpaper, I rubbed away at the paint until I finished with the chippy, half sanded look that I was after.


Above is the before and after on the side bars.
Here below is the before, during and after of a carved detail on the bed head.
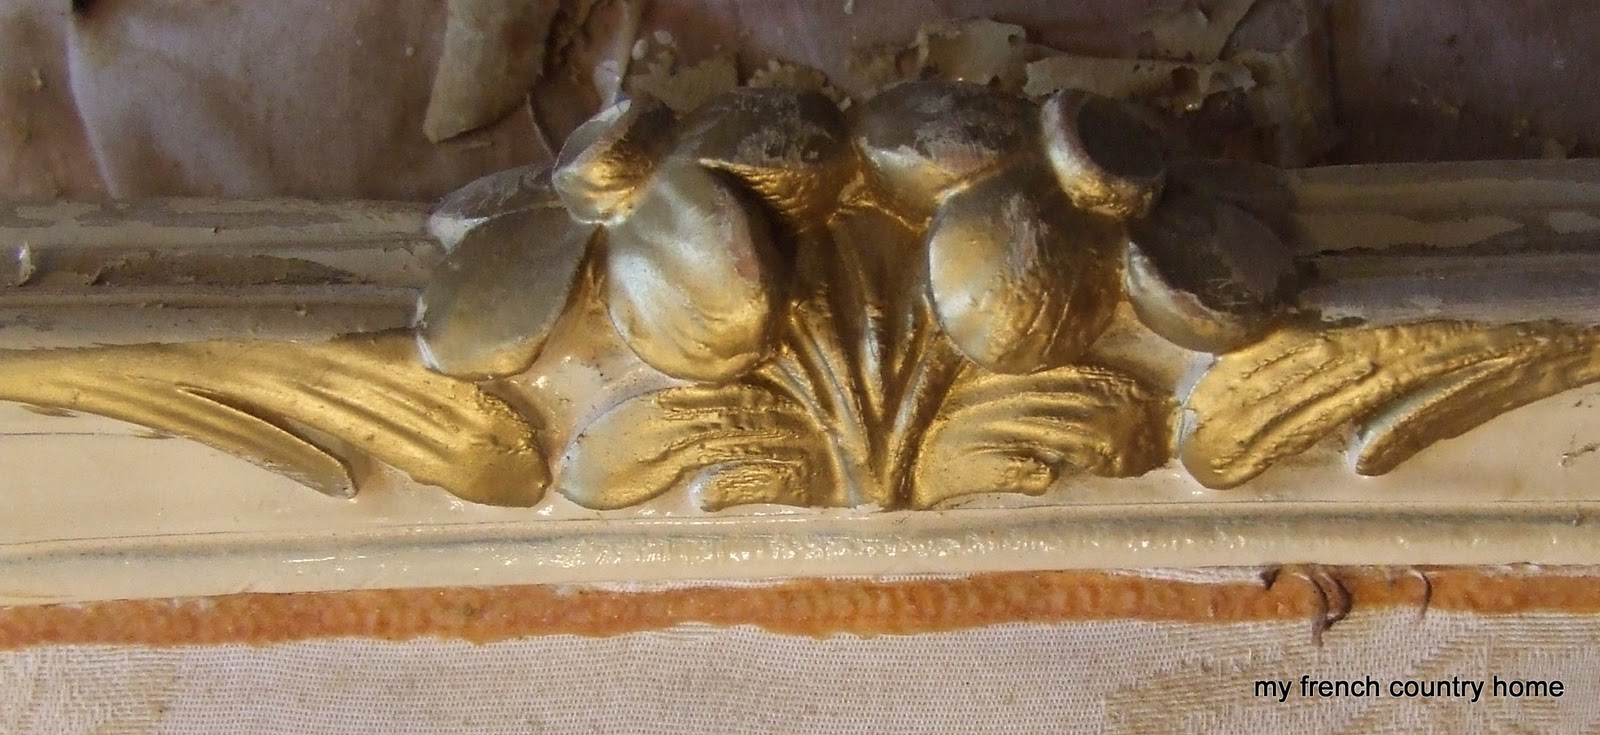
In this first picture I have just removed the trim that covered the glue.
In the second picture I have stripped and sanded as far as I wanted. Note the damage to the material. This is why it's a good idea to leave the old material on while treating the wood. I didn't mind the damask being burnt or ripped, but I wanted to preserve the stuffing beneath.

This last picture show the same moulding, sanded, waxed and witht the new covering and trim.


These are pictures of the stage where I slightly lost the plot. I should never have tried removing the damask without checking what was going on underneath. When the old fabric came off, instead of finding the lining I was expecting, I was straight down to a synthetic stuffing, just packed in loose. GRRR! Here I spent alot of time removing hundreds of staples used by the last upholsterer.

My family heard ALL ABOUT the stuffing incident, as I stomped and cursed and groaned my way through clouds of volatile padding. In the end I pinned the stuffing down under a thick wadding material , got it as flat as possible then started positioning the linen.

I had cut the linen sheets carefully in pieces that allowed about 3" extra material all round. This is vital for pulling on the material and achieving the taught look.
Now comes the most difficult part - for a non-pro like me. You have to pull hard on the fabric, and staple as you go. I worked from the centre outwards, keeping a close eye on the corners as I went. The bedhead wasn't too hard, but the curved corners of the foot of the bed proved trickier. I admit that I stapled and unstapled a great deal - the family heard ALL ABOUT this bit too.


Once I was at last satisfied that the material was really taught and smooth with no unsightly ripples or creases, I cut back against the staples so that the fabric only just came to the wooden edge of the bed.

This was the easy bit, using fabric glue I simply had to position the passementerie or trim I had bought and cover the staple to make the bed look finished.

I then had the fun of setting up the whole thing in the sunshine, just for the sake of the pretty pictures I showed you yesterday. Oh yes, and by the way, when you have a project like this, check the staircase before you get too excited - this baby had to go in via a ladder and through the window. Just one way to spend an afternoon!


Just for info, here are the only tools I needed, thermal paint stripper, sandpaper, pliers and screwdriver for removing staples, stapler, fabric glue,

I am happy to be linking up to the DIY Project Party at the DIY Club

and to this weeks Project Parade at
The DIY Show Off

PS. A thank you to all of you who have noticed that my thumbnail pic is no longer working!! I think that blogger is punishing me for having tried to hand out tips on getting around their latest teaser!! GRRRRR!!
No comments:
Post a Comment